
A Guide to Using PowerPoint
Part 2
How to ...
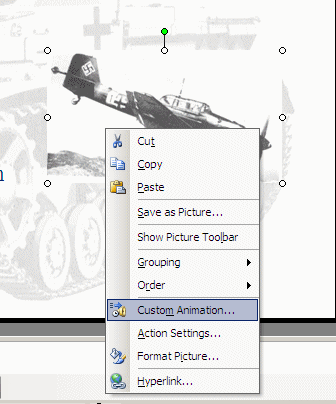
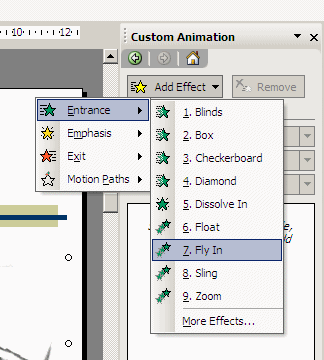
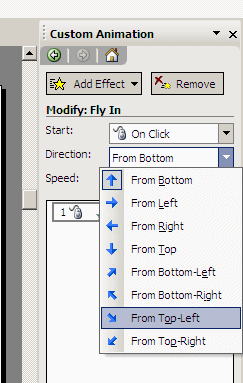
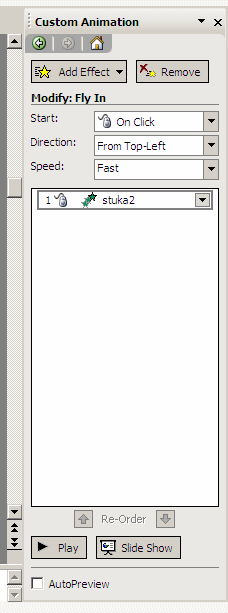
Add an animation effect
One of the most dramatic features of PowerPoint is the ability to animate the entry and exit of items in a slide. See an example
|
 |
|
 |
|
 |
|
 |
| Text as well as images may be animated | |
|
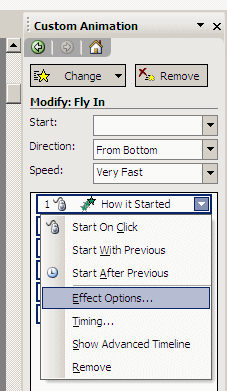 |
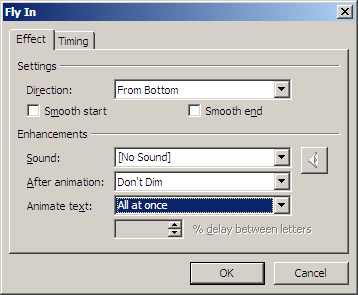
- Beware of changing 'Animate text - All at once' to 'By word' or 'By letter'. The effect produced looks good the first time you see it but very quickly becomes irritating if a large area of text is animated since it slows down the display of text. If you must use 'By letter' then animate a single word like this - no more.
- Another animation 'effect' to be careful of using is the 'Swivel' effect available under Entrance > More Effects... This effect makes the text spin on a vertical axis and quickly becomes irritating since the text appears then disappears preventing you from reading it.
Create your own background image
It is possible to use an image as a background image. The trick, however, is to use an image which text will show up against. It may be that you can use a colour for the text which is not present in the background image but it's better to modify the image by fading or washing it out. That way the user is not distracted from the content of the presentation by the background image.
How to produce a washed out background image was covered in Unit 6 Creating a faded background image. For a PowerPoint presentation, a large size is not important since PowerPoint will scale the image as necessary. An image 800 x 600 in size is ample.
Modifying an image for use in a slide animation
For the Tanks page of a World War II presentation this picture of
a World War II tank was found. 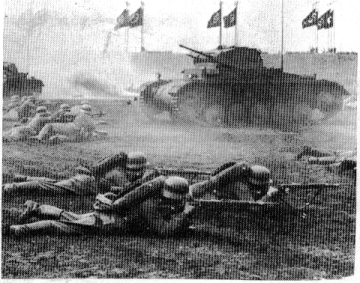
It was decided that the page would be more effective if the picture could be split into two parts - a battlefield and a tank. The tank would then be animated to roll onto the battlefield scene from the right. This was done in PaintShop Pro in two stages:
- Selecting the tank and making a transparent image from it
- Cloning the battlefield area over the tank in the original image
Both
of these are techniques used in the 'Retouching
tutorial'
Create your own sound
For the Tanks page of a World War II presentation a sound of a
World War II tank was needed. Most sounds can be found on Internet
by searching but in this case nothing suitable could be found to go
with this picture:
a sound was needed with machine gun fire, a tank
moving and a tank cannon firing. The sound needed to be about 12
seconds long.
Searching on Internet found machine guns, an explosion and the sound of a bulldozer! Audacity, a free program from Source Forge, was then used to create the sound required.
- Step 1 was to load Audacity and the machine gun sound
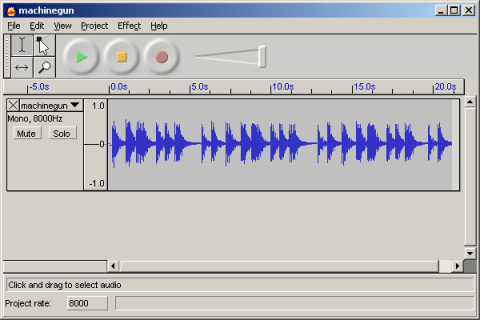
This screen shows this sound loaded - just over 21 seconds of sound. You can listen to it by moving your pointer over the green play button - Next the Bulldozer sound is loaded into the same window. This
is done by using
Project > Import Audio
- At this point you are likely to receive a warning
message:

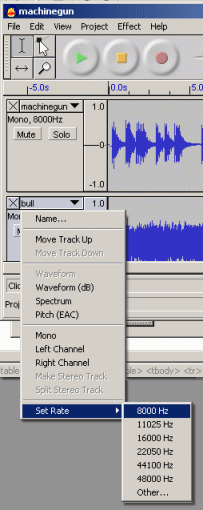 If you get a message like this choose the sample which
has the highest sample rate (You can see this under the title bar
for each sample) and reset it to the rate shown in the other
sample as shown in the picture on the right. In this example the
sample rate is being set to 8000Hz. This means the sound will be
of lower quality but since it will consist of bangs and clanks it
won't really matter. If the noise was more musical then you might
have to consider changing the sample rate to that of the highest
quality sample.
If you get a message like this choose the sample which
has the highest sample rate (You can see this under the title bar
for each sample) and reset it to the rate shown in the other
sample as shown in the picture on the right. In this example the
sample rate is being set to 8000Hz. This means the sound will be
of lower quality but since it will consist of bangs and clanks it
won't really matter. If the noise was more musical then you might
have to consider changing the sample rate to that of the highest
quality sample.
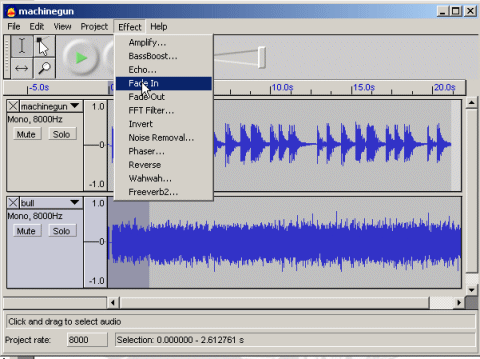
- The next step is to fade in the sound of the bulldozer to give
the effect that it is coming closer. To do this drag across the
first 2.5 seconds of the bulldozer sound clip then choose
Effects > Fade in. You can use the green Play
button in the image below to hear the effect. In audacity, if you
don't like it you can use Edit > Undo to put
it back to normal and try again with different settings. Remember
though that only the marked area will play in Audacity so click in
the window to remove the marked area first.
- Now it's time to add the sound of the cannon firing. In reality, a World War II tank would have stopped so that accurate aim could be taken. (It was impossible then to hit a target accurately when the gun barrel was bouncing up and down as the tank moved). So we want the sound of the tank tracks to stop and then for the gun to fire. To do this the sound of the tank tracks is faded out from 7.5 seconds to 8.0 seconds. This is easier to do if we zoom in on the sound. This can be done by choosing View > Zoom in or pressing Ctrl 1 twice.
- Once you have zoomed in scroll to the area around the 8 second
mark and mark the area of sound on the bulldozer track from 7.5 to
8.0 seconds then choose Effects > Fade out
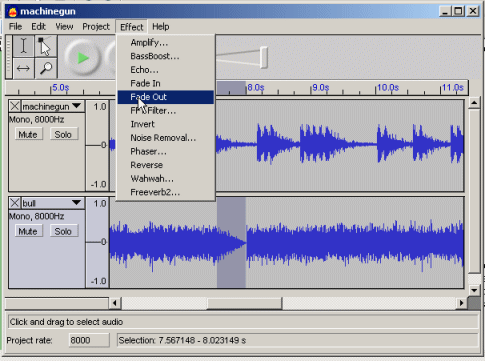
Once again you can hear the effect by clicking the green Play button. - Oops! we still have the remaining part of the bulldozer sound there. This area will need marking and deleting from Audacity. To do this drag from the 8.0 second mark - where the point is on the waveform - to the end of the bulldozer track and press 'Delete'
- Now we need to import the 'explosion' sound. This is done
exactly the same way as before. Choose Project > Import
Audio.. and select 'explosion.wav'. Since the sound of
the explosion is sampled at the same 8000Hz rate it won't need
altering this time.
Again you can hear the effect by putting your mouse over the green play button. (warning - it's loud) - As you can hear (and see) The explosion is at the wrong end of the sound. To fix this first zoom in twice again, (Ctrl 1 twice), then click at the beginning of the explosion track. Use the left arrow key of your keyboard a few times to make sure you are at the exact start of the track then choose Edit > Insert Silence... In the window which opens change the value to 8.0 seconds and click OK
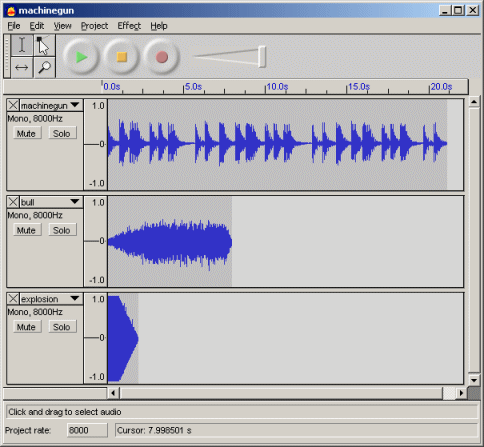
- Now zoom out using View > Zoom Out or
Ctrl 3 twice You can see the sound is now
approximately 10 seconds long to the end of the explosion. Using
the technique described earlier the section from 11 seconds to 12
seconds was marked in the machine gun track and faded out as
before. The excess sound was deleted by marking it and pressing
'Delete'

- The final step is to save the sound file. So that it can be used by both PowerPoint and a web browser this was done by using File > Export as Wav... and saved as 'ww2tank.wav'. You can hear it by moving your mouse over the green play icon in the picture above.
"All things are difficult before they are easy."- Thomas Fuller
Showcase / folder / folder / file /