Beginners Tutorial - Using the David Griffiths Lake Applet
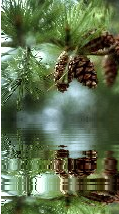
In this tutorial you will learn how to produce an animated Java lake picture something like this - except the water will be moving!
This tutorial assumes you know NOTHING about a Java lake and very little about HTML. Let me guess, to you, Java is something you drink from a cup or some Island in the East Indies, and HTML are the letters on your grandmother's licenses plate right? Well....maybe you know a little more than that, nevertheless, if you have gone to one of those other tutorials and learned absolutely nothing, then you will love our '.class'
Let's get you started by telling you what you will need for our tutorial, so grab a pen and paper and get ready to takes some notes.
First and foremost, you will need to go to the principal's office (i.e. David Griffiths Web Site) and ask permission to borrow a file. I'm sure he won't mind. Don't be shy, go on and ring the door bell. Here it is...
Click the top link in the window which opens and save the file Lake.zip to your desktop. You can now click on it to unpack the file. Now you might get a warning message about this sort of file being unsafe to run but we've checked it for viruses and it's ok - trust us. (If you don't - then there's not much we can do to help further).Now you have the files. Let's make a new folder to put the papers since this one is a little tattered from being passed around so much. Let's call it 'Lake' for now so we can easily get to it.

Now, open your new folder and lets see what is in it. You should have the following files:
Ok, for now, the only one we are interested in is the lake.class
- scenic_button.jpg
- clouds_button.jpg
- dglogo.gif
- sunset_button.jpg
- city_button.jpg
- clouds.jpg
- scenic.jpg
- lake.class
- city.jpg
- sunset.jpg
- readme.htm
Now, let's get some pictures to work with. This is not a brilliant example, but it will serve our purposes.
Right click over the picture below and save it to your hard drive. To those of you using a Mac or something other than a PC, use your normal way of saving files from the web.
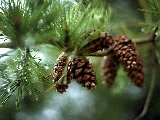
Oh Dear! What happened to our lake?You will need to know the width and height of your image. We have done that for you here, it's 320 pixels wide and 240 pixels high. If you don't know what a pixel is, you can find out here
.Ok, now we need some HTML (Hyper Text Markup Language), that stuff that looks like Geek. We have provided you with some here, but, to use it you will need a good text editor. We recommend Edit Plus if you don't already have one (You can use Notepad for a PC, Simple Text for a Mac or Edit for Acorn users).
In your Text editor, type the following code in, or cut and paste - save it as pine1.html and then load the file in your browser. This will not quite work yet, but we will explain later what's wrong and how it works:
<HTML>
<HEAD>
<TITLE>Pinecone Lake</TITLE>
<META NAME="Author" CONTENT="You" / >
<META NAME="Keywords" CONTENT="java,lake,pinecone,David Griffiths,example">
<META NAME="Description" CONTENT="My first Lake Applet">
</HEAD>
<BODY BGCOLOR="#FFFFFF">
<APPLET code=lake width=120 height=160>
<PARAM name=image value="pinecone.jpg">
</APPLET>
</BODY>
</HTML>
Don't fret, it's there. We just can't see it until we move on to our next step.
We have to adjust the height of the applet...according to David G., this is how it's done. We take the height of the image, which is 160, double that giving 320 and subtract 10 (give or take when necessary) giving us 310. Now let's adjust our code:
<HTML>Ok, let's see if it works now.
<HEAD>
<TITLE>Pinecone Lake</TITLE>
<META NAME="Generator" CONTENT="EditPlus 1.1">
<META NAME="Author" CONTENT="JayDax">
<META NAME="Keywords" CONTENT="java,lake,pinecone,David Griffiths,example">
<META NAME="Description" CONTENT="My first Lake Applet">
</HEAD>
<BODY BGCOLOR="#FFFFFF">
<APPLET code=lake width=160 height=320>
<PARAM name=image value="pinecone.jpg">
</APPLET>
</BODY>
</HTML>
If you've followed our tutorial to the letter and are still having problems contact-
![]()
and we'll either help or for a small fee, do the applet for you.