People have a fascination with waterfalls and moving water. Often would be designers try to use a Java Lake Applet to animate a waterfall picture but there's a right way and a wrong way to produce a Java animated waterfall. This tutorial tells you how to create an animated waterfall the right way using the David Griffiths 'horizon' lake applet.
Warning! This is an advanced skills tutorial. You will need to be familiar with PhotoShop or other powerful graphics editor and have a reasonable knowledge of HTML coding.
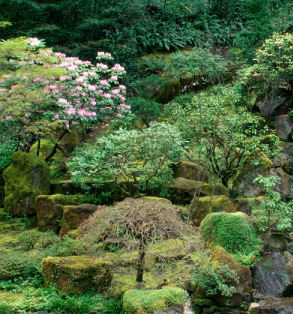
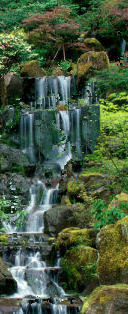
Lets start by finding a nice waterfall image - here's one:
 Pretty isn't it?
Now what we want to do is make the water appear to flow down the waterfall and into a gently rippling lake at the bottom.
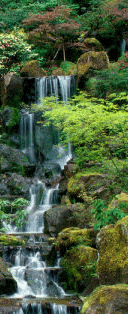
The first thing to consider is not to use too large an image. The bigger it is the slower the effect will be to start. In this case I've resized the image to a size of 480 by 360 pixels. At that size it should be visible in most browser windows without scrolling and won't put too much of a strain on less powerful computers.
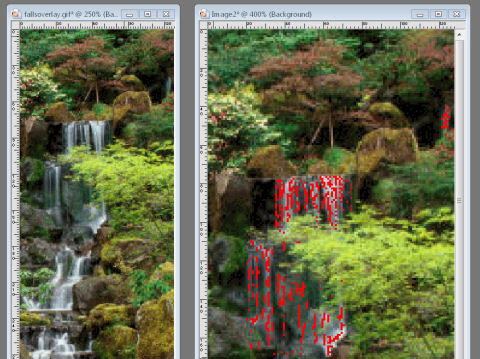
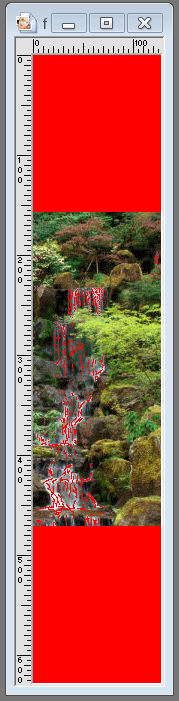
The next step is to split the image up into sections. I'm going to animate the water at the bottom and the area of the falls. I don't need to animate the top left or top right areas so these will be left as standard jpg images. Altogether I used my graphics editor (I used PaintShop Pro X) to create four jpg images and two gif images Here they are jpg images highlighted in red and gif images highlighted in green:


Let's start by modifying the falls overlay image. That's this one ![]()
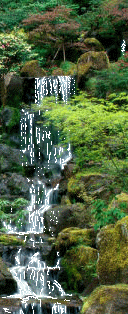
Drop it into your image editing program and, using a colour which is not present in the image, start drawing lines at random where you see the water falling in it. You'll probably find it's best to do this with a copy rather than the original so that if you make a mess of it you can easily start again. In general, draw more where the water is lighter. With a complex overlay I find it easiest to work at a high magnification, a one pixel size brush, 100% hardness and opacity and a step of 1. I often draw in red since that seldom appears in waterfalls.
In best Blue Peter tradition - here's the overlay image partly finished:(Blue Peter is the name of a Children's TV program in the UK which teaches how to make things and usually features lots of 'Here's one I made earlier' comments)
Having made the overlay I set the colour I've been drawing in to be transparent and save it as a .gif image using a filename such as 'fallsoverlay.gif'. The finished overlay is shown below; because it's now a transparent gif image you can see the white page background through the areas I've made transparent.
 Try dragging this image over the page.
Now it's time to create the first of our Java applets. Create a folder to contain all the files; in my case I've named it 'waterfall'. Copy into it the files fallssource.jpg, fallsoverlay.gif and the class file you need lake.class
Create a new html file and save it as index.htm in your folder. In the html file add the following code:
<span>

  <applet code="lake.class" id="lake" width="128" height="314">

  <param name=image value="fallssource.jpg">

  <param name="horizon" value="0">

  <param name="overlay" value = "fallsoverlay.gif">

  </applet>

  </span>
Save your html file again and preview it in your browser. You should get this:
I think you'll agree that this doesn't look at all right yet although you might begin to get an idea how the waterfall applet will work.
 We need to go back to our image editing software and make some adjustments.
The I find it's best to double the height of the overlay. Since the overlay is currently 314 pixels high we need to change the canvas size of the overlay to 628 pixels, adding an extra 157 pixels at top and
36 bottom.
This produces ![]()
When that image is saved and used in the applet you get:
Still not right!
Going back to the image editing program select the 'red' background and then invert the selection. Move the selected area up the image a bit and re-save it. Try your web page again - don't forget to refresh it to see the changes. In my case I found I had to move the non-transparent bit all the way to the top but that isn't always the case.
Here's the result now. Some people find this quite acceptable but looking carefully I see that there are green areas in the moving water of the waterfall. What's happening is the wave action of the applet is moving the tree branches up and down past our transparent area. We need to use the clone, push and smear tools to remove the green branches which show.
Back at the image editor, load the file fallssource.jpg and make a copy of it. Remove the offending branches and save the result as 'fallssource2.jpg'. Don't save it as the original filename since you will need an unaltered copy later.
I find it's easiest to use the magic wand tool to make a selection of the 'green' areas. This prevents me messing up the areas I want to keep. If you are using PaintShop Pro, the settings for the magic wand are:
Here's the original image compared with the modified version with green bits removed:
Original |
Modified |
|
 |
fallssource.jpg |
fallssource2.jpg |
Lets see what the applet looks like now using the modified source image:
<applet code="lake.class" name="lake" width="128" height="314" align="left" id="lake">

  <param name=image value="fallssource2.jpg" />

  <param name="horizon" value="0" />

  <param name="overlay" value = "fallsoverlay3.gif" />

  <param name="speed" value = "15" />

  <param name="href" value ="http://www.jaydax.co.uk" />
<img src="fallssource.jpg" alt="" border="0" width="128" height="314" />

</applet>
You'll notice I've added some extra lines in the code:
<param name="speed" value = "20" />slows down the animation. It can have a value from 1 to 100 with 50 being the default.<param name="href" value ="http://www.jaydax.co.uk" />makes the applet act as a link to my site.<img src="fallssource.jpg" alt="" border="0" width="128" height="314" />uses our original source file - this will be displayed only if the browser can't display Java applets.Now did you notice anything else wrong? There's a really annoying flicker at the bottom of the applet.
Time to turn to some JavaScript to find the cure. Next stage