Getting waterfall speed and source image right
One of the nice features about the final version of the David Griffiths lake applet is that it can be controlled by JavaScript
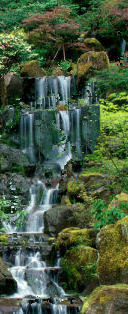
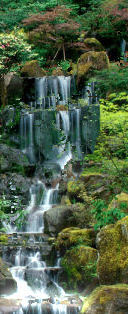
At the moment, using the source and overlay images the applet looks like this:
Wouldn't it be nice if you could switch the overlay on and off so that you could see where the source image needed modifying?
You can. Try using these controls:
Here's the source code needed to do this. You'll notice I've added a fourth overlay image which has no transparent gaps 'fallsoverlay4.gif'. I produced this by pasting the original fallssource.jpg over the top of fallsoverlay3.gif and saving it with a new filename. You'll need to copy this into your waterfall folder.
Experiment to find the best speed setting for the most realistic falling water.
You'll notice that at the bottom of the applet you get dark bands in the waves. This is easily noticed at a speed setting of '1' and the overlay turned off. This is what causes that annoying flicker. The answer to this is to load fallssource2.jpg back into your photo editor and to use the lighten brush to progressively lighten the bottom of the image. Save the altered image as fallssource3.jpg (Now you can try those extra radio buttons.)
Here's a comparison of the three source images produced so far. Notice the lighter area at the base of the final image:
Original |
Modified |
Final |
 |
 |
 |
fallssource.jpg |
fallssource2.jpg |
fallssource3.jpg |
The next stage is to add the side images and the bottom applet. Stage 3